This is the first part in a series on using fn-fx for Desktop GUI application development in clojure.
fn-fx is a clojure wrapper over JavaFx, described by wikipedia as “a software platform for creating and delivering desktop applications, as well as rich Internet applications (RIAs) that can run across a wide variety of devices”.
Calling fn-fx a wrapper over JavaFx is doing it a disservice. fn-fx provides a declarative and functional interface over JavaFx - data is used to express the GUI elements and any changes to the data trigger changes in the GUI elements.
Let’s start this series with our version of the “hello world” of desktop applications - a button with text and the behaviour associated with the button press.
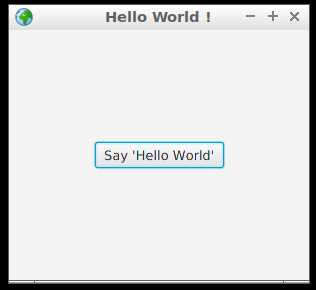
Pressing the button changes the text to “Said ‘Hello World’” and disables the button for five seconds. After five seconds the button reverts to it’s original state and text. Let’s go one step beyond the introductory JavaFx tutorial and set an image as the icon on the title bar - notice the globe on the left end of the title bar.
The full code is here.
The data
Data holds centre stage in any clojure program and our fn-fx application is no different. The UI consists of a button that can be in either enabled or disabled state and has text printed on it corresponding to the current state. We use a clojure map to hold the state of the button and the text associated with each state. The value associated with the key :button-state changes in response to user actions and can be either :enabled or :disabled. The key :button-text only associates the button state with the text to be displayed on the button and never changes.
{:button-state :enabled,
 :button-text {:enabled "Say 'Hello World'"
               :disabled "Said 'Hello World'"}}
The button
We use the defui macro to generate user components. User components have a rendering function for the UI element and an optional diff function that can efficiently detect when the component should be updated. The name of the user component created by defui is the kebab case version of the camel case name of the macro’s first argument - TheButton in the code below becomes the-button and can be referred to by that name in othe functions.
(defui TheButton
  (render
   [this args]
   (let [button-state (:button-state args)
         button-text ((:button-text args) button-state)]
     (ui/stack-pane :children [(ui/button :text button-text
                                          :disable (= :disabled button-state)
                                          :on-action {:event :button-press})]))))
The ‘args’ to the render function is the data we described in the previous section. The :button-state is used to extract what text to display on the button and the :on-action property let’s us associate the event data that will be generated on button press.
The stage
The JavaFx stage is the top level desktop application window. We set the name displayed on the title bar, the icons, the function to be called on exit and a scene element. The scene holds the UI elements and sets the size of the window. In our applicatin the root of the scene is just the user component the-button.
(defui TheStage
  (render
   [this args]
   (let  [image-value-tp (ui/image :is (io/input-stream
                                        (io/resource "icon.png")))
          image (render-core/convert-value image-value-tp
                                           javafx.scene.image.Image)]
     (ui/stage :title "Hello World !"
               :on-close-request (force-exit)
               :shown true
               :icons [image]
               :scene (ui/scene :root (the-button args)
                                :width 300
                                :height 250)))))
Note how we set the title bar icon from a png file. It’s a bit convoluted since the ui/image is not the same as the javafx.scene.image.Image class and has to cast to the proper type using the convert-value function.
Our force-exit function creates a javafx.event.EventHandler that shuts down the JavaFx platform and any clojure agents we might have running. Our application uses an agent to encapsulate the data associated with the button state and text. We will see why we chose to use an agent in the sections below.
(defn force-exit
  []
  (reify javafx.event.EventHandler
    (handle [this event]
      (shutdown-agents)
      (javafx.application.Platform/exit))))
The -start
Every JavaFx application must extend the javafx.application.Application class and define a start method that acts as the entry point for the JavaFx runtime. Let’s look at our start function.
(defn -start
  [& args]
  (let [data-state (agent {:button-state :enabled,
                           :button-text {:enabled "Say 'Hello World'"
                                         :disabled "Said 'Hello World'"}})
        handler-fn (fn [{:keys [event]}]
                     (condp = event
                            :button-press (button-press data-state)))
        ui-state (agent (dom/app
                         (the-stage @data-state)
                         handler-fn))
        update-ui-state (fn [_ _ _ _]
                          (send ui-state
                                (fn [old-ui]
                                  (dom/update-app old-ui
                                                  (the-stage @data-state)))))]
    (add-watch data-state
               :ui
               update-ui-state)))
There are a lot of things happening in this function so we will take it step by step.
- data-state is a var that holds our UI data - the current state of the button and the text to be associated with each state. The value of :button-state acts as the lookup key for :button-text nested map.
- handler-fn is the eventhandler to process user actions. In this simple application we have to handle only one event - :button-press. The homonymous function button-press updates the data-state agent on getting a request.
- ui-state is an agent that wraps the datastructure or DOM returned by the fn-fx.fx-dom/app function. Our handler-fn is registered as a javafx.beans.value.ChangeListener to be called whenever data-state changes.
- update-ui-state is a four argument function required by our add-watch on the data-state. The fn-fx.fx-dom/update-app function compares the data-state before and after applying the handler-fn and re-renders the UI when the data-state has changed.
- Finally in the body of the function we add a watch on our data-state.
The -main class
The -main function in the namespace main is the entry point of the our JavaFx application. The sole job of this class is to call a function in the core namespace that does the actual work of initializing our application.
(defn -main
  [& args]
  (core/start-javafx))
All JavaFx programs must extend the javafx.application.Application class. Calling the launch method of the Application class creates the JavaFx application thread, which handles GUI construction and updates.
(defn start-javafx
  [& args]
  (javafx.application.Application/launch fn_fx_simple.core
                                         (into-array String args)))
Wrapping it up
This was our first fn-fx application. Stay tuned for more.